Dehaze
This tutorial shows how to deal with haze that plagues a lot of scenery photos. Dehazing relies on much of the same techniques as Fake HDR, since essentially the core of both is enhancing subtle detail. Also hazy photos tend to benefit from some fake-HDR enhancing as well. The general steps involved are:
- Use the whole histogram range,
- apply local contrast filters to enhance the subtle details remaining in the haze (this is the major task),
- probably denoise because we’re likely to be pushing the image hard with the brightness and contrast steps.
- Finally of course we apply all the eyecandy, sharpening, scaling, etc. we want for the final look. That’s not really part of dehazing anymore, though.
Our example image is a typical shot of the Inca town of Machu Picchu in hazy conditions.
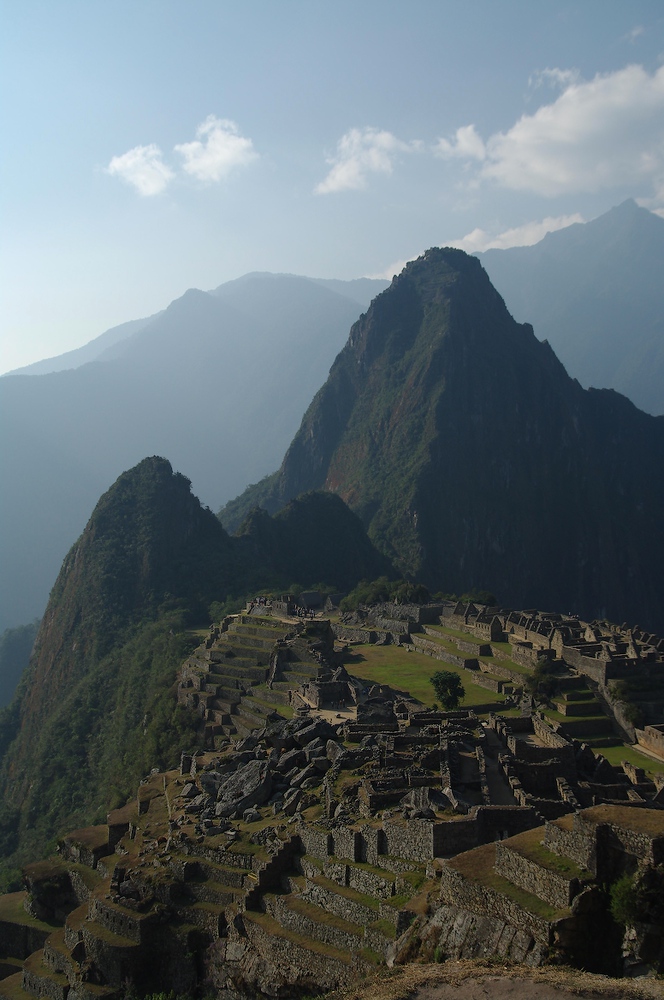

The left image is the Jpeg straight from the camera. Especially note the lack of detail on the mountain range in the background. The back light situation (the sun is just to the left of the image) also doesn’t exactly improve things. On the right we see the final result. The mountain range and sky both gained a tremendous amount of detail. The same is true for the dark parts of the mountain peaks in the foreground.
Now, how to dehaze? First we need to understand that there is no single definite way. Some hazy images might turn out great with the exact settings from this tutorial. Others need a slightly different treatment. However, the basic steps are always the same. Just play with the settings and filters a bit until you reach a satisfying result.
When we open up the RAW image in Photivo with no active filters, it looks like this:

Brighten
Our first task is to make use of as much of the histogram range as possible to prepare for the following enhancing of every possible contrast. A great filter to achieve this is Brighten (Reinhard tonemapping) on the RGB tab. Brightness controls the overall strength of the brighten effect, Light is useful for fine tuning the brightening, and Chrominance affects how warm or cold colours come out. For more details have a look at the Photivo manual. For our example image Brighten with -30/1/0 settings works well.

As we can see, the histogram is now spread a lot more nicely over the whole range. However, Brighten is not always the best choice. Especially for already quite bright images with haze all over the foreground and background Brighten tends to be too strong even at low settings. Then a simple Expose adjustment or brightening Basecurve (Output tab) can be the better alternative. We’ll just have to try what works best.
Dynamic Range Compression and Contrast Enhancement
The core part of dehazing happens on the Lab Color/Contrast tab. The first filter we need is Dynamic Range Compression, usually with Amount around 0.5 to 0.6. Bias controls the brightness and with Color Adaption we can counteract colour shifts introduced by the compression. Here is what the filter does:

There’s two things to notice in comparison to the brighten step:
- The clouds, background mountain range and foreground mountain peaks gain a good bit of detail.
- The ruins in the foreground look awful, a lot worse than before.
However, this is exactly the input we need for the subsequent contrast filters. With those it’s time to experiment again, since what looks good here depends a lot on the actual image. As a general guideline:
- First try the halo based Local Contrast Stretch, start with high values for Opacity and Masking and play with those two sliders until artefacts disappear.
- Texture contrast is a useful addition or even an alternative to the local contrast stretch filter. Texture Contrast I is pre-set to enhance small detail, Texture Contrast II works on a larger scale. In the example I decided on a Texture curve (that also works on small details) to selectively push the details in the ruins.
- Most likely we need some additional global contrast as well, so let’s have a look at the Output tab. The most common way to push contrast here is to use the rather strong sRGB gamma compensation. However, for our example a more subtle approach with Sigmoidal contrast and 4.8/0.28 settings was the better solution.
With all of these filters we finally have a properly dehazed image.

It’s not perfect yet. The colours are still too flat and the sky on the left appears too blown out. But solving those issues is not part of the dehazing. Since dehazing tends to push the image data close to the limit, some denoising and sharpening is probably required almost always. The rest is – again – playing around.
Eyecandy and Final Touches
What to do to finish the process depends on the artistic choice of how we want the final image to look. On the two Eyecandy tabs I decided to use a soft Vignette for more pleasing picture corners and two Gradual overlays to darken the top left part of the image and to enhance the warm orange colours of the ruins in the foreground. Some sharpening and scaling to the final resolution complete the image.

That concludes our dehazing tutorial. ![]() I’m sure you have some pictures lying around your want to try this on!
I’m sure you have some pictures lying around your want to try this on!