Using Photivo
Calling Photivo intuitive would be a bit of a stretch by any means. ![]() But once we know our way around using it feels quite fluent. In this article we’ll explore the major details of using Photivo.
But once we know our way around using it feels quite fluent. In this article we’ll explore the major details of using Photivo.
Subpages
The Main Window
Essentially, Photivo’s application window consists of three areas.
- The tool pane on the left, where all the editing takes place.
- The large image area, where we see our image.
- The zoom bar at the bottom, mainly used for zooming the image.
We’ll take a closer look at the the tool pane later since it is a bit more complex. The other two areas are quite straight forward, though.
The Image Area
The largest part of Photivo’s window is reserved for the image. You can use the mouse wheel or the number keys 1 to 4 to zoom. In the top right corner Photivo displays the new zoom settings when you change it. The top left corner is used for other status overlays. For example, there Photivo displays the current general status when processing the pipe.

The image area also has a right-click context menu. Two of its sub-menus are especially interesting. Mode puts the image in a variety of specialised display modes. They are informative only, i.e. even when one of them is active while saving the normal RGB picture is saved.

- RGB is the normal display of the “real” picture.
- Structure gives us a good impression of the distribution of detail throughout the image.
- Gradient shows the luminance gradient that represents the edges in the picture.
- L*, a* and b* display the different channels of the LAB colour space: luminance (L) and the two colour channels (A, B).
Clipping indicates clipped image areas.

- Indicate toggles the clipping indicator.
- Over exposure and Under exposure controls the type of clipping that is taken into account.
- With R, G and B we select for which of the RGB channels we want to see over/under expose information.
The Zoom Bar
In the zoom bar we can do most of the things the image area itself provides as well, i.e. zooming, changing the view mode and putting Photivo into fullscreen mode. Since everything is available in the image area anyway, I tend to hide the zoom bar and make a bit more space for the image itself.
Opening the Sources
Currently Photivo provides three ways to open a file.
- Drag&Drop the file onto the image area.
- Use the command line:
photivo -i "my input file.tif". - The Input tool on the the Camera tab.
Let’s take a closer look at the Input tool.

We can see entries for three types of input files.
- Open file loads an image. Photivo supports a wide variety of formats. In fact everything that dcraw and GraphicsMagick can handle. This includes most RAW image formats, all the major bitmap formats (JPEG, PNG, TIFF, etc.) and a lot more obscure formats.
- With Open settings file we load a previously saved filter configuration. That’s the
.ptsfiles Photivo saves automatically alongside each output image. These files contain the complete filter chain for that particular picture. If you edit an image and later want to recreate your filters exactly as they were, just load the original image file, then load the settings file and you are back where you left off. - Open preset is a similar function. Presets are basically general purpose settings files where you can store settings for individual filters. For example, if you find a particular setting for the Dynamic Range Compression filter useful in certain situations, right-click on the filter heading and chose Save preset to store the current configuration for this filter. It will automatically show up in the Open preset dialog. The second entry in the right-click menu, Append preset, adds a filter configuration to an existing preset. That way you can build presets that contain the configuration for more than one filter.

Filtering
In Photivo all filtering is done via the tool pane that is divided in three parts:
- the histogram at the top,
- the filter tabs with all the tools,
- the controls at the bottom.
The Histogram
The top of the tool pane is occupied by the histogram that shows you the RGB value distribution of your image from dark (on the left) to bright (on the right).

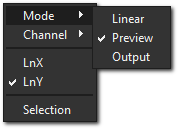
Usually the combined graph for all three RGB channels is shown but you can change that in the histogram’s context menu. Just select what you need from the Channel submenu.

The second interesting context menu option is Selection that lets you restrict the histogram to a certain part of the image. It works similar to crop. You click Selection and when Photivo shows Crop in its status overlay select the relevant part of the image with the mouse. Another click on Selection changes back to normal full-image histogram view.
Using Filters
Filtering an image means configuring Photivo’s processing pipe. Have a look at the Workflow article to get an idea about how the pipe works and how the tool pane’s layout reflects the actual processing pipe. Basically filters are applied to the picture in the same order they appear in the tool pane.
General Usage
The tool pane is mainly designed to be used with a mouse. You can use the mouse wheel to do all the scrolling. Wheeling with the cursor positioned on the tabs changes through the tabs. Wheeling on a slider changes the slider’s value by a rather large amount. If you need smaller steps, move your mouse cursor over the edit field displaying the actual value and continue wheeling there.
You can also enter a specific value via the keyboard. To activate the new value you need to press Enter or click somewhere outside the edit field.
A right click on a slider or combobox resets it to its default value. With a right click on the tool header and choosing Reset from the menu you can reset a complete tool to its defaults.
Blocking and hiding tools
Photivo provides several colour coded status indicators for the tools. See the following screenshot.

A green dot on a tab means that at least one tool is active on that tab. Similarly individual tools get a green arrow if they are active. Red arrows indicate blocked tools. You can access the blocking functionality with a right click on the tool header.

To block a tool, choose Block from the menu. The tool’s settings stay at the value you chose but Photivo will exclude it from being processed in the pipe. To re-enable the tool, right click on the header again and choose Allow. That way you can quickly switch a filter on and off without losing its configuration. That’s especially useful for filters with lots of sliders.
With the same context menu you can also Hide filters from the GUI. Hidden filters are also disabled, i.e. they don’t get processed even if they had active settings. Press H to see a list of all hidden tools. U unhides all tools on the current tab.
The Bottom Controls
The bottom part of the tool pane contains the essential non-filter tools and some status information.

The controls in (1) affect the pipe. The combobox on the left sets the pipe size. For fastest processing and best quality you should choose the next possible pipe size that is larger than your needed output resolution. Also keep the 32bit issue in mind.
With the button next to the pipe size combobox you select the pipe’s preview mode. In its default state (like shown in the screenshot) the image you see is always the fully processed one. Click the button to switch to tabbed preview. The pipe will still process all the way but what you’ll actually see in the image area will change according to the tab you have selected. For example if you select the RGB tab you’ll see the image as it looks when the pipe has run until the end of the RGB tab. Switch tabs to see other stages of processing.
The manual checkbox and button control the pipe’s execution mode. Usually the pipe re-processes automatically once you change any setting. When you activate manual mode, the pipe only runs when you explicitly execute it with the process button next to the manual checkbox or by pressing F5.
The controls in (2) switch between the tool pane’s different modes. From left to right those are:
- Processing. The filter tabs for image editing.
- Settings. Photivo’s programme options.
- Info. Displays most important EXIF data and information about image size.
The bottom left status bar displays information about what Photivo is doing at the moment. The top right buttons are for output saving and Gimp export.
Saving the Results
When saving your finished image, first go to the Output Parameters on the Output tab. Here you can choose the file format and quality settings for the output file.

For JPEG you should keep the colour space at 4:2:2 for maximum compatibility. When saving to a PNG file, Quality actually means compression level. There is no quality setting in the sense of the word because PNGs are always lossless.
Include metadata writes the original EXIF data to the output file. Erase thumbnail discards all thumbnail images that might have been present in the the original image.
Title, Tags and Rating are metadata entries that are compatible for example with digiKam but also a variety of other image organizers.
You actually save the file with the save button (the floppy disk icon) in the bottom controls.

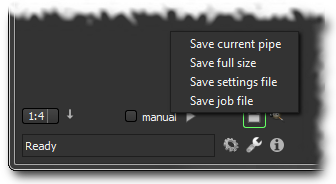
A simple left click on the button triggers the default save action that can be configured in the settings. By default it is set to save the current pipe. A right click on the button opens the save menu.
- Save current pipe saves current state of the pipe, i.e. what you currently see on screen.
- Save full size processes the image in the 1:1 pipe (if necessary) and then saves the output.
- Save settings file only writes the
.ptsfile that contains the complete settings for your picture. Save current pipe and Save full size also create that.ptsfile automatically. - Save job file saves a job file that afterwards can be used in Photivo’s batch mode. Job files can be executed by "
photivo -j JOBFILE" on the terminal. Note: On windows there is no terminal output, unless you use the troubleshooter version of Photivo.
Gimp Export
Photivo can also export the processed image to Gimp for further editing. That’s the job of the Gimp export button.

A left click sends the image in the current pipe to Gimp. Right click the button for full size export.
For the button to work you need to have the Photivo Gimp plugin installed. See the Gimp Integration page for setup instructions.

